Thursday, May 7, 2020

Learn A-Z Kali_Linux Commands For Beginerrs

Iemhacker-linux-command-for-beginner

All commands (A-Z) for Kali Linux here:
A
apropos Search Help manual pages (man -k)
apt-get Search for and install software packages (Debian/Ubuntu)
aptitude Search for and install software packages (Debian/Ubuntu)
aspell Spell Checker
awk Find and Replace text, database sort/validate/index
B
basename Strip directory and suffix from filenames
bash GNU Bourne-Again SHell
bc Arbitrary precision calculator language
bg Send to background
break Exit from a loop •
builtin Run a shell builtin
bzip2 Compress or decompress named file(s)
C
cal Display a calendar
case Conditionally perform a command
cat Concatenate and print (display) the content of files
cd Change Directory
cfdisk Partition table manipulator for Linux
chgrp Change group ownership
chmod Change access permissions
chown Change file owner and group
chroot Run a command with a different root directory
chkconfig System services (runlevel)
cksum Print CRC checksum and byte counts
clear Clear terminal screen
cmp Compare two files
comm Compare two sorted files line by line
command Run a command – ignoring shell functions •
continue Resume the next iteration of a loop •
cp Copy one or more files to another location
cron Daemon to execute scheduled commands
crontab Schedule a command to run at a later time
csplit Split a file into context-determined pieces
cut Divide a file into several parts
D
date Display or change the date & time
dc Desk Calculator
dd Convert and copy a file, write disk headers, boot records
ddrescue Data recovery tool
declare Declare variables and give them attributes •
df Display free disk space
diff Display the differences between two files
diff3 Show differences among three files
dig DNS lookup
dir Briefly list directory contents
dircolors Colour setup for `ls'
dirname Convert a full pathname to just a path
dirs Display list of remembered directories
dmesg Print kernel & driver messages
du Estimate file space usage
E
echo Display message on screen •
egrep Search file(s) for lines that match an extended expression
eject Eject removable media
enable Enable and disable builtin shell commands •
env Environment variables
ethtool Ethernet card settings
eval Evaluate several commands/arguments
exec Execute a command
exit Exit the shell
expect Automate arbitrary applications accessed over a terminal
expand Convert tabs to spaces
export Set an environment variable
expr Evaluate expressions
F
false Do nothing, unsuccessfully
fdformat Low-level format a floppy disk
fdisk Partition table manipulator for Linux
fg Send job to foreground
fgrep Search file(s) for lines that match a fixed string
file Determine file type
find Search for files that meet a desired criteria
fmt Reformat paragraph text
fold Wrap text to fit a specified width.
for Expand words, and execute commands
format Format disks or tapes
free Display memory usage
fsck File system consistency check and repair
ftp File Transfer Protocol
function Define Function Macros
fuser Identify/kill the process that is accessing a file
G
gawk Find and Replace text within file(s)
getopts Parse positional parameters
grep Search file(s) for lines that match a given pattern
groupadd Add a user security group
groupdel Delete a group
groupmod Modify a group
groups Print group names a user is in
gzip Compress or decompress named file(s)
H
hash Remember the full pathname of a name argument
head Output the first part of file(s)
help Display help for a built-in command •
history Command History
hostname Print or set system name
I
iconv Convert the character set of a file
id Print user and group id's
if Conditionally perform a command
ifconfig Configure a network interface
ifdown Stop a network interface
ifup Start a network interface up
import Capture an X server screen and save the image to file
install Copy files and set attributes
J
jobs List active jobs •
join Join lines on a common field
K
kill Stop a process from running
killall Kill processes by name
L
less Display output one screen at a time
let Perform arithmetic on shell variables •
ln Create a symbolic link to a file
local Create variables •
locate Find files
logname Print current login name
logout Exit a login shell •
look Display lines beginning with a given string
lpc Line printer control program
lpr Off line print
lprint Print a file
lprintd Abort a print job
lprintq List the print queue
lprm Remove jobs from the print queue
ls List information about file(s)
lsof List open files
M
make Recompile a group of programs
man Help manual
mkdir Create new folder(s)
mkfifo Make FIFOs (named pipes)
mkisofs Create an hybrid ISO9660/JOLIET/HFS filesystem
mknod Make block or character special files
more Display output one screen at a time
mount Mount a file system
mtools Manipulate MS-DOS files
mtr Network diagnostics (traceroute/ping)
mv Move or rename files or directories
mmv Mass Move and rename (files)
N
netstat Networking information
nice Set the priority of a command or job
nl Number lines and write files
nohup Run a command immune to hangups
notify-send Send desktop notifications
nslookup Query Internet name servers interactively
O
open Open a file in its default application
op Operator access
P
passwd Modify a user password
paste Merge lines of files
pathchk Check file name portability
ping Test a network connection
pkill Stop processes from running
popd Restore the previous value of the current directory
pr Prepare files for printing
printcap Printer capability database
printenv Print environment variables
printf Format and print data •
ps Process status
pushd Save and then change the current directory
pwd Print Working Directory
Q
quota Display disk usage and limits
quotacheck Scan a file system for disk usage
quotactl Set disk quotas
R
ram ram disk device
rcp Copy files between two machines
read Read a line from standard input •
readarray Read from stdin into an array variable •
readonly Mark variables/functions as readonly
reboot Reboot the system
rename Rename files
renice Alter priority of running processes
remsync Synchronize remote files via email
return Exit a shell function
rev Reverse lines of a file
rm Remove files
rmdir Remove folder(s)
rsync Remote file copy (Synchronize file trees)
S
screen Multiplex terminal, run remote shells via ssh
scp Secure copy (remote file copy)
sdiff Merge two files interactively
sed Stream Editor
select Accept keyboard input
seq Print numeric sequences
set Manipulate shell variables and functions
sftp Secure File Transfer Program
shift Shift positional parameters
shopt Shell Options
shutdown Shutdown or restart linux
sleep Delay for a specified time
slocate Find files
sort Sort text files
source Run commands from a file `.'
split Split a file into fixed-size pieces
ssh Secure Shell client (remote login program)
strace Trace system calls and signals
su Substitute user identity
sudo Execute a command as another user
sum Print a checksum for a file
suspend Suspend execution of this shell •
symlink Make a new name for a file
sync Synchronize data on disk with memory
T
tail Output the last part of file
tar Tape ARchiver
tee Redirect output to multiple files
test Evaluate a conditional expression
time Measure Program running time
times User and system times
touch Change file timestamps
top List processes running on the system
traceroute Trace Route to Host
trap Run a command when a signal is set(bourne)
tr Translate, squeeze, and/or delete characters
true Do nothing, successfully
tsort Topological sort
tty Print filename of terminal on stdin
type Describe a command •
U
ulimit Limit user resources •
umask Users file creation mask
umount Unmount a device
unalias Remove an alias •
uname Print system information
unexpand Convert spaces to tabs
uniq Uniquify files
units Convert units from one scale to another
unset Remove variable or function names
unshar Unpack shell archive scripts
until Execute commands (until error)
uptime Show uptime
useradd Create new user account
userdel Delete a user account
usermod Modify user account
users List users currently logged in
uuencode Encode a binary file
uudecode Decode a file created by uuencode
V
v Verbosely list directory contents (`ls -l -b')
vdir Verbosely list directory contents (`ls -l -b')
vi Text Editor
vmstat Report virtual memory statistics
W
wait Wait for a process to complete •
watch Execute/display a program periodically
wc Print byte, word, and line counts
whereis Search the user's $path, man pages and source files for a program
which Search the user's $path for a program file
while Execute commands
who Print all usernames currently logged in
whoami Print the current user id and name (`id -un')
wget Retrieve web pages or files via HTTP, HTTPS or FTP
write Send a message to another user
X
xargs Execute utility, passing constructed argument list(s)
xdg-open Open a file or URL in the user's preferred application.
yes Print a string until interrupted
. Run a command script in the current shell
!! Run the last command again

More articles


  1. Crack Definicion
  2. Growth Hacking
  3. Hacking Etico Certificacion
  4. Hacking Xbox One
  5. Herramientas Hacking
  6. Paginas De Hacking
  7. Libros Hacking Pdf
  8. Growth Hacking Marketing
  9. Hacking Growth Pdf
  10. Hacking Usb
  11. Quiero Ser Hacker
  12. Libro Hacking Etico

Evil Limiter: Taking Control Of Your Network Bandwidth


Ever wanted to block someone from the network or limit their bandwidth without having the network admin privileges? Well Evil Limiter has got you covered then.


An amazing tool to help you control your network without having access to the admin panel.

Today I'm gonna show you how to use this interesting tool to take control of your network.


Requirements:

1. A PC or Laptop with Linux OS.
2. A Network Adapter.
3. Access to the Network you want to control.
4. sudo or root access on your Linux OS.

First of all we will download the tool from its github repository:

https://github.com/bitbrute/evillimiter

You can download and extract the zip file from the link above or you can clone evillimiter repository using git like this:


git clone https://github.com/bitbrute/evillimiter 


Now lets install the downloaded tool on our machine

Step 1: Move inside the downloaded github repository

cd evillimiter


Step 2: To install type


sudo python3 setup.py install


wait for the installation to finish (May take some time)


Step 3: To run type


sudo evilimiter


Voila! That's it, you got it up and running on your machine


Now how do you control your network with it, its very easy.

It should detect your network automatically but yeah you can set it up manually as well using the command line argument -i.

After you have selected the right interface to control, you need to scan your network for live hosts. To perform the scan type


scan


you can pass an optional flag to the scan command which is range which will help you to specify the range of ip addresses you want to scan like this


scan --range 192.168.1.1-192.168.1.100


The above command will scan a total of 100 hosts from 192.168.1.1 to 192.168.1.100


Now after you have scanned your network next thing is to list the hosts that have been discovered during the scan for that you type the hosts command like this


hosts


Now you know the hosts on your network and now you should know which host you wanna block or limit based on the mac address of the host. Remember the host id of the host that you want to block or limit bandwidth of and lets do the magic.

to block a host from using the internet we simply specify the block command followed by the host id of the host that we want to block like this

block 1


if instead of blocking the host we just want to limit his internet bandwidth we can do just that by using the limit command followed by the host id and then the bandwidth that we want to allocate to that particular host like this


limit 1 100kbits


Wohooo! yeah its that easy and yes you can do all this without having the network admin role.

Now if you want to show mercy on that poor guy (blocked host), you can set him free by using the free command followed by the host id like this:

free 1


Well isn't administrating your network bandwidth so easy now.

Hope you enjoyed this tutorial.:)

Related links
  1. Hacking Y Seguridad
  2. Ethical Hacking Certification
  3. El Mejor Hacker Del Mundo
  4. Hardware Hacking
  5. Informatico Hacker
  6. Hacking Food
  7. Hacking Madrid
  8. Hacking Wifi Windows
  9. Hacking Tools
  10. Hacking To The Gate
  11. Hacking Social
  12. Hacking Language
  13. Curso Hacker

Networking | Switching And Routing | Tutorial 1 | 2018


Welcome to my new series of tutorials about networking. Moreover in this series I'll discuss briefly each and every thing related to routing and switching. After that you will able to pass an exam of HCNA, CCNA etc. First of all you have to know which software is used by which company such as Huawei used its own software named eNSP while Cisco used its own software named Cisco Packet Tracer. After that you have to know that how to download and install both of the software in your computer systems. So the purpose of this blog is to give you people an overview about how to download and install both of them.

What is a Network? 

First of all we must have to know about what is a network. So the network is the interconnection of two or more than two devices in such a way that they can communicate each other. In computer networks we can say that the interconnection of two or more than two end devices (computer, laptops, printers etc) for the sake of sending and receiving some amount of data is known as computer network.

What is Internet?  

The very simple and easily understandable definition of a internet is "The network of networks". Now what is meant by that? When different networks from the different areas or at the same areas wanna communicate with each other then internet formed. So we can say that "Internet is the interconnection of different networks in such a way that networks can communicate with each other".


Figura 17: Cómo montar un PiProjector
Hecho esto solo falta alimentar nuestro proyector, para ello tenemos dos opciones, la primera de ellas es utilizar el puerto de corriente de la placa DMD o utilizar una batería portátil y alimentarlo directamente a través del puerto MicroUSB de la Raspberry Pi Zero. En cuanto a el audio es importante saber que no contamos con un jack de 3.5 así que habrá que buscar otras alternativas cómo utilizar un módulo Bluetooth.

4.- Alarma doméstica

El segundo de los proyectos de los que os hablaremos hoy es la construcción de vuestro propio sistema de alarma doméstica a medida usando un proyecto basado en Raspberry Pi Zero, y podrás implementar una pantalla para controlar el sistema, además de numerosos sensores, incluso una cámara de vigilancia o altavoces para hacer sonar la alarma.

Figura 18: Alarma basada en Raspberry Pi Zero

Es posible que la inversión inicial supere las primeras cuotas de algunos de estos servicios, sin embargo una vez que tengamos todo montado y funcionando no tendremos que preocuparnos de pagar una mensualidad. A continuación os explicaremos cómo montar la versión más básica de este proyecto, con un precio inferior a los 100 euros y que contara con una pantalla táctil y un sensor de movimiento. Lo primero será reunir los materiales necesarios, en este caso son los siguientes:
Raspberry Pi Zero W 
- Tarjeta micro SD 
Pantalla táctil Adafruit PiTFT de 3,5" 
-Sensor de movimiento PIR genérico 
En este caso el montaje es de lo más sencillo solo tenemos que utilizar los conectores para pantalla de la Raspberry Pi Zero, es recomendable utilizar un "extensor" para poder manipular la Raspberry Pi Zero sin problemas en un futuro. En cuanto al sensor solo habrá que alimentarlo utilizando algunos de los pines que no hayamos utilizado en la parte trasera de la pantalla, tendremos que localizar uno que esté a 5 voltios, uno con toma a tierra y uno de salida de la GPIO que este libre (por ejemplo el pin 23).

En cuanto al software utilizaremos la aplicación Home Assistant, esta app Open Source y es posiblemente una de las mejores opciones para la creación de un hogar con domótica por ti mismo ya que permite la implementación de gran variedad de sensores y dispositivos con los que activar nuestra alarma y enviarnos una notificación a nuestro móvil.


Figura 19: Guía de iniciación a Home Assistant


Otra gran ventaja es que si no incluimos ningún zumbador o sirena nuestra alarma funcionará como una alarma silenciosa sin alertar a los intrusos y nos permitirá avisar rápidamente a la policía. Si por otro lado buscas un efecto más disuasorio solo tienes que conectar un zumbador. El único inconveniente que tiene la opción de recibir las notificaciones en nuestro dispositivo es que la única forma de armar o desarmar la alarma es a través del interfaz web.

Cuando nació este proyecto no existía ninguna API que nos permitiese utilizar los comandos de armado y desarmado de forma manual y enviase una alerta con cualquier cambio de estado. Por eso mismo Colin O´Dell, la mente detrás de este interesante proyecto, desarrolló su propia API basada en MQTT que es capaz de funcionar como una alarma convencional y nos permitirá comunicarnos de manera bidireccional con nuestra alarma utilizando un teclado remoto, solo será necesario tener acceso a Internet.

Figura 20: Web del proyecto de Pi Alarm

En la página web del proyecto, Colin explica detalladamente como realizar todo el proceso de instalación y configuración del software en la Raspberry Pi Zero, además podréis encontrar todo el software necesario en su página de GitHub. En cuanto a la alimentación es posible alimentar el sistema con una batería portátil, sin embargo es recomendable conectar nuestra alarma a la red eléctrica, para ello debemos utilizar un transformador como el que utilizamos para cargar nuestros smartphones .


Figura 21: Demo de Pi Alarm

Para terminar con el montaje necesitaremos una carcasa para proteger nuestro montaje, al igual que en algunos de los proyectos que os hemos expuesto previamente la impresión 3D nos ofrece una solución sencilla y económica para esta cuestión, pero si no dispones de una impresora 3D también podrás diseñar y crear tu carcasa utilizando cualquier tipo de material como madera o placas de aluminio o materiales acrílicos.

Autor: Sergio Sancho Azcoitia

***********************************************************************************
Raspberry Pi Zero para "Makers": 6 PoCs & Hacks Just for Fun (1 de 3)
- Raspberry Pi Zero para "Makers": 6 PoCs & Hacks Just for Fun (2 de 3)
- Raspberry Pi Zero para "Makers": 6 PoCs & Hacks Just for Fun (3 de 3)
***********************************************************************************

Related posts

Friday, May 1, 2020

Improving The 2D Noise Page

One of my goals for 2019 is to improve my existing pages. Yesterday I decided to work on my old 2D noise page. We normally use Perlin/Simplex noise to make terrain heightmaps, but on that page I used Fourier transforms instead. Perlin/Simplex noise are a fast approximation of the things you can get from Fourier transforms.

The 3D renderer on that page always bothered me. It was one of my early experiments with WebGL. I had never been able to figure out exactly what I didn't like or how to fix it.

I decided to improve the renderer.

I read through the code to and realized it was written so long ago that let and const weren't even widely available! I started by updating the code style to match the code I write today. I read through the rendering code and decided to switch from raw WebGL to regl.js, which lets me experiment and iterate much more quickly.

I wanted to compare the old and new output easily, so I put them side by side on the page. I wanted to try two techniques with the new renderer:

  1. Instead of building a new 3D quad mesh on the CPU every time the data changed, I built a single 2D triangle mesh with x,y, and then read the heightmap data from a texture on the GPU. Reading textures from vertex shaders is widely supported now. This way, I only have to update the texture on each render instead of rebuilding the mesh. Unfortunately I couldn't figure out why it wasn't interpolating pixels values; I had to put in my own interpolation.
  2. Instead of calculating normals and lighting on the CPU every frame, I calculated them in the fragment shader on the GPU. But I didn't want to use a standard lighting system; I wanted to apply outlines instead. I had learned how to do this in mapgen4 and wanted to try an even simpler approach here. This worked out really well.

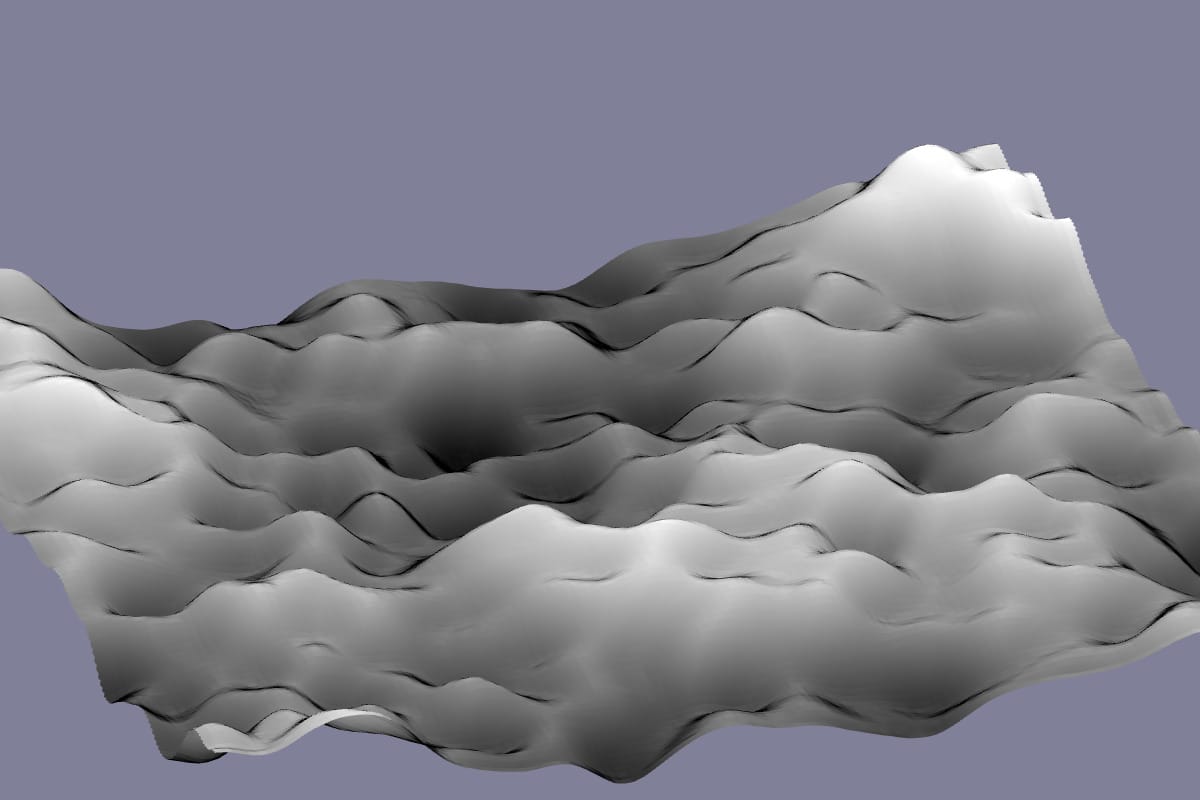
In this comparison you can see how the dark/light spots in the noise are renderered in the two renderers. With the old renderer (green) the color changes but the shapes are all mushy. With the new renderer (gray) the dark/light matches the noise, and the mountain peaks are easier to see.

2D noise values Old renderer New renderer
Landscape: old (green) and new (gray) renderer

In smooth areas you can see how the outlines help show the shapes. You can also see that the old renderer flipped the elevation upside down (oops!).

2D noise values Old renderer New renderer
Smooth area: old (green) and new (gray) renderer

With blue noise (positive exponents) the new renderer looks much better:

2D noise values Old renderer New renderer
Blue noise: old (green) and new (gray) renderer

I'm really really happy with outlines! Compare:

No outlines Light outlines Medium outlines
Without and with outlines

The outlines are one line of code:

void main() {   float light = 0.1 + z - fwidth(z) * u_outline;   gl_FragColor = vec4(light, light, light, 1); } 

I darken the color based on fwidth(z). The GL extension OES_standard_derivatives calculates how much an expression changes from the current pixel(fragment) to adjacent pixels. When z changes a lot, that usually means it's changing from one mountain peak to another, so I darken the output color.

There are still more things I'd like to improve on this page, but the renderer was the thing that bothered me the most, and I'm now happy with it. The other changes will wait until another day.

The New Angry Birds Game Is A Master Class On Hyper Casual Game Design

I have already discussed this subject here and here, but, from time to time, I like to bring it up again just to remind myself of the huge potential of hyper casual games in the contemporary scenario.

The inspiration for this text was the new Angry Birds mobile game named "Dream Blast". Created by Rovio Studio, the game is an excellent example of how it is possible to create an interesting gaming experience using hyper casual game design. 


The game mechanics consist of a very simple touch-screen gesture where you must destroy two or more connected balls of the same color. If you destroy four or more balls, you will create a red bird. If you create two red birds side by side they will become a yellow bird; and, finally, if you create two yellow birds side by side you will create a big black bird. Each one of them, when touched, explodes in a different way destroying more or less of the scenario. 

The interesting part of the gaming experience comes from how the levels show interesting and varied challenges just by using a touch movement in the screen. The video below shows the intro and some of the main features of the gameplay:


Obviously, Dream Blast uses a business model based on virtual coins that the player can earn by playing or just buying them from the game store. 

Another interesting point of this subject is: how platforms like Google Stadia and Apple Arcade will change the "ecosystem" of the hyper casual games. Will they attract this kind of players to simple experiences with multiscreen possibility? But that's a subject for another post.

#GoGamers